Walk into a room you painted two years ago and notice peeling edges, streaky rollers marks, or that one wall that never quite matched the others. That frustration is almost always the result of skipping a step, using the wrong tool, or choosing the wrong method for the surface. Mastering the right wall painting methods changes all of that. This guide covers everything you need to know for both interior and exterior projects: the tools that matter, surface prep that actually holds, proven application techniques, and how to avoid the mistakes that lead to early failures.
Table of Contents
- Key takeaways
- Wall painting methods start with the right tools
- Interior painting techniques for a smooth finish
- Exterior wall painting methods built for durability
- Fixing problems and maintaining painted walls
- My honest take after years of watching paint jobs succeed and fail
- Ready to start your next painting project?
- FAQ
Key takeaways
| Point | Details |
|---|---|
| Prep determines success | Skipping surface preparation is the number one cause of premature paint failure on any surface. |
| Two coats beat one | Applying two thin coats produces a better finish and longer life than one heavy pass. |
| Weather matters outdoors | Exterior paint performs best when applied between 50°F and 90°F with low humidity. |
| Right primer, right result | Bare wood, repaired spots, and major color changes all require a dedicated primer for lasting adhesion. |
| Tools shape the finish | Matching the right brush, roller, or sprayer to your specific surface type directly affects the final look. |
Wall painting methods start with the right tools
Before you apply a single drop of paint, you need the right supplies and a properly prepared surface. This is where most DIY projects either succeed or fall apart.
Must-have painting tools
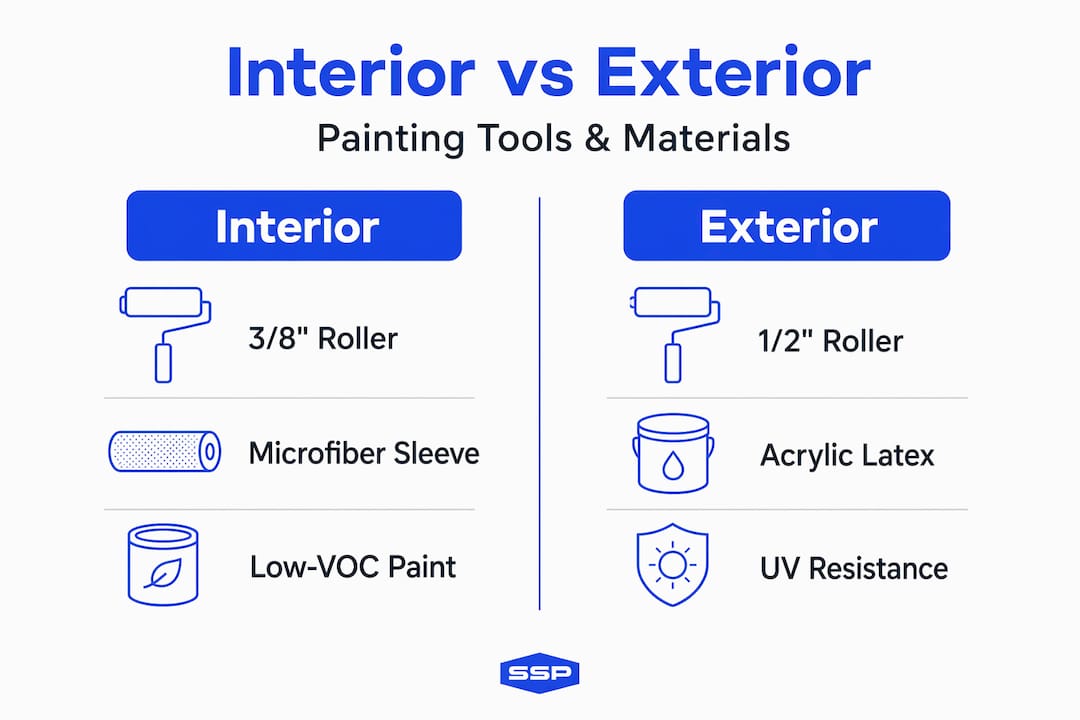
The best painting tools for most homeowners fall into three categories: brushes, rollers, and sprayers. Angled sash brushes (2 to 2.5 inches) handle cutting in around trim and corners with precision. Rollers with a 3/8-inch nap work well on smooth interior walls, while exterior and textured surfaces call for a 1/2-inch or 3/4-inch nap to push paint into crevices. Airless sprayers cover large exterior surfaces fast, but they require masking off nearly everything nearby and a steady hand to avoid uneven coverage.
For interior painting techniques, a quality microfiber roller sleeve makes a measurable difference in finish quality compared to cheap foam alternatives. Investing in a proper roller frame with a threaded handle also lets you attach extension poles for ceilings and high walls without straining your back.
Comparing tools and materials for interior vs. exterior
| Item | Interior | Exterior |
|---|---|---|
| Roller nap | 3/8 inch (smooth walls) | 1/2 to 3/4 inch (textured/rough) |
| Brush type | Angled synthetic bristle | Stiff synthetic or natural bristle |
| Primer type | Drywall or adhesion primer | Masonry, wood, or stain-blocking primer |
| Paint finish | Eggshell, satin, or flat | Satin or semi-gloss for durability |
| Tape | Standard painter's tape | UV-resistant exterior tape |
| Caulk | Paintable latex caulk | Flexible elastomeric caulk |
Painting preparation steps you cannot skip
Skipping surface preparation is the number one cause of premature paint job failure, indoors and out. For interior walls, that means washing surfaces with a TSP (trisodium phosphate) substitute or sugar soap solution, filling holes and cracks with spackling compound, and sanding smooth once dry. For exterior walls, debris, dirt, mold, and chalky old paint must all come off before anything else happens.
Dedicated primer is necessary on bare wood, repaired spots, and any surface where you are making a major color change. Combo paint-and-primer products work fine for maintenance repaints over existing sound surfaces, but they are not a substitute when the substrate needs genuine sealing or adhesion work. Always protect flooring with canvas drop cloths rather than plastic sheeting, which becomes slippery and shifts underfoot.
Pro Tip: To get truly sharp paint lines, seal the edge of your painter's tape with a thin coat of base color before applying your top coat. The base paint seals any small gaps in the tape, so the top color cannot bleed underneath.
Interior painting techniques for a smooth finish
With your surfaces prepped and your tools assembled, the actual painting process follows a specific order that prevents overlap marks and produces a consistent finish across every wall.
Here is the workflow that Southshorepaint recommends for interior walls, built around the same sequence professional painters follow on every job:
- Cut in first. Use your angled brush to paint a 2 to 3 inch band along every edge where a roller cannot reach: ceiling lines, baseboards, door frames, and corners. Work one wall at a time so the cut-in paint stays wet when you roll.
- Roll immediately after cutting in. Start rolling while the brushed edges are still wet. This keeps a wet edge active across the whole wall and prevents the cut-in line from drying into a visible ridge.
- Use a W or M rolling pattern. Load the roller and apply paint in a wide W or M shape, then fill in the gaps without lifting the roller. This distributes paint evenly and reduces streaking.
- Apply two thin coats, not one heavy coat. Applying too much in a single pass causes drips, uneven texture, and slow curing. Two thin coats also produce noticeably better color depth.
- Feather the final strokes. On the last pass of each coat, use very light, long strokes from top to bottom to blend any texture differences while the paint is still open.
- Allow full drying time between coats. Follow the manufacturer's recoat window, which is typically two to four hours for latex paint, but factor in humidity and temperature in your space.
Ventilation affects both drying time and the quality of the finish. Open windows and run a fan to keep air moving, but position fans so they circulate air rather than blow directly onto wet walls, which can cause uneven drying.
One of the most forward-thinking interior painting techniques right now involves gradient shading within the same color family. Rather than a single solid wall color, you blend two or three shades of the same hue from floor to ceiling. This technique creates depth and a cocooning quality that solid colors cannot achieve. It does require careful planning, a good-quality brush for the blending zone, and patience, but the result looks custom rather than generic.
Pro Tip: When feathering edges at the transition between two paint colors or two wet sections, add a paint conditioner like Floetrol to your latex paint. It extends the open time of the paint so you have more control over blending without lap marks forming.
For a deeper look at tools and application sequences, Southshorepaint's interior wall painting guide walks through each step with additional detail.
Exterior wall painting methods built for durability
Exterior painting introduces variables that indoor projects never have to consider: weather, direct sun, moisture in the substrate, and surfaces that expand and contract with temperature changes. Getting these variables right is what separates a paint job that lasts eight years from one that starts peeling in eighteen months.
Weather conditions for exterior painting
Paint applied outside the 50°F to 90°F temperature range is at serious risk of film failure, and painting outside this window can cause the job to fail within one to two years. Humidity above 85% also interferes with adhesion and drying. Always check both temperature and humidity forecasts before starting. How local weather patterns affect your specific area is worth understanding in detail, and Southshorepaint's guide on exterior painting conditions covers regional factors that general guides often miss.
| Condition | Recommended range | Risk if ignored |
|---|---|---|
| Air temperature | 50°F to 90°F | Blistering, cracking, or poor adhesion |
| Surface temperature | Below 90°F | Lap marks, rapid drying |
| Relative humidity | Below 85% | Slow drying, mildew under paint |
| Wind speed | Calm to light breeze | Uneven spray coverage, debris in paint |
| Time after power washing | 24 to 48 hours dry | Adhesion failure from trapped moisture |
Surface prep for exterior walls
Power washing at 1,500 to 2,000 PSI removes dirt, mold, and chalky residue from the surface. After washing, allow 24 to 48 hours of drying time before priming or painting. Skipping this drying period leads directly to adhesion failure, often visible within the first season.
Caulk all gaps around windows, doors, and trim with a flexible elastomeric caulk before painting. These gaps are entry points for water, and water infiltration behind paint causes blistering and accelerates rot on wood substrates. For wood surfaces specifically, wood moisture content must be below 15% before paint goes on. Use a moisture meter to confirm this. Painting over wood that reads above 15% traps moisture and leads to both paint failure and potential rot.
For humid or high-UV climates, acrylic latex paints with mildew resistance and UV inhibitors offer significantly better longevity than standard exterior paints. The chemistry in these formulations directly addresses the stresses your specific environment places on the paint film.
Applying paint in direct sun causes the surface to dry faster than the paint can bond properly, which leads to lap marks and blisters. Work in the shade, following the shadow around your house throughout the day. Two-coat application is the standard for exterior durability, and the Southshorepaint exterior painting workflow guide outlines the complete sequence from prep to final coat.
Pro Tip: Before painting any exterior wood surface, test moisture content with a pin-type moisture meter. Push the probes into an inconspicuous area and read the percentage. If it reads above 15%, wait. Paint applied over damp wood will fail regardless of how well everything else is done.
Fixing problems and maintaining painted walls
Even well-executed paint jobs develop issues over time. Knowing how to identify and fix them quickly extends the life of your work significantly.
Common problems and their causes:
- Drips and runs. Almost always caused by loading the brush or roller too heavily. Let the paint dry fully, sand the drip smooth with 220-grit sandpaper, and touch up with a thin coat.
- Peeling or blistering. On interior walls, this typically signals moisture coming through the substrate or paint applied over a dirty or glossy surface. On exterior walls, blistering usually means paint was applied in direct sun or over damp wood.
- Lap marks. These appear when a section of paint dries before you roll into it. Maintaining a wet edge throughout each wall section prevents them. Paint conditioner additives also help in warm or dry conditions.
- Uneven sheen. Often caused by mixing paint from different batches or applying coats unevenly. Box your paint (combine multiple cans of the same color into a larger bucket) before starting to keep color and sheen consistent throughout the job.
- Mildew growth. On exterior walls in humid climates, dark spotting may appear over time. Clean with a diluted bleach solution, allow the surface to dry, and repaint with a mildew-resistant formula.
Regular maintenance extends the life of any paint job. Inspect painted surfaces annually for early signs of wear, address small cracks or peeling immediately before water gets involved, and clean exterior walls every one to two years to remove organic buildup. Catching problems early is always far less expensive than a full repaint.
For touch-up work, always store leftover paint in a tightly sealed container with a piece of plastic wrap pressed directly onto the paint surface before closing the lid. Label each can with the room and color name. This prevents a skin from forming and keeps the paint usable for several years.
My honest take after years of watching paint jobs succeed and fail
I've watched homeowners spend a full weekend painting a room only to have it look worse than the wall they started with, and almost every time, the problem started well before the first brush stroke. In my experience, the single biggest mistake people make is treating prep as optional. Patching holes takes thirty minutes. Washing walls takes an hour. But those steps are what separate paint that lasts from paint that embarrasses you a year later.
I've also seen people invest in premium paint and then apply it with a three-dollar roller sleeve from a discount bin. That defeats the purpose entirely. A quality microfiber roller and a good angled brush make premium paint perform the way it is supposed to. The tools matter almost as much as the product.
What working on both interior and exterior walls has taught me is that durability is almost entirely a function of what you do before the paint goes on. Temperature, surface moisture, adhesion, priming, the right caulk in the right places. None of it is difficult or complicated. It just requires patience and the willingness to do the steps that feel slow.
For anyone new to DIY painting, my honest advice is to start with one interior wall, not an entire room. Practice your cutting-in technique, learn how your roller behaves with different paint loads, and build real confidence before taking on a full exterior project. The skills transfer. The confidence compounds.
— Ryan
Ready to start your next painting project?
Whether you are refreshing a single interior room or tackling a full exterior repaint, having the right paints, primers, and tools under one roof makes the process considerably smoother. Southshorepaint offers quality products and practical guidance built around the same prep-first philosophy this article covers.

From choosing the right primer for your specific surface to selecting the best finish for high-traffic rooms, the resources at Southshorepaint are built for homeowners who want professional results without professional prices. Browse paint options, explore detailed how-to content, and get the premium paint guidance you need to make every coat count.
FAQ
What are the best wall painting methods for beginners?
Start with interior walls using a brush-and-roller method: cut in edges with an angled brush, then roll the main surface in a W pattern. Applying two thin coats with proper drying time in between produces a clean, professional finish without experience.
How many coats of paint does an exterior wall need?
Most exterior surfaces require two coats for full coverage and durability. Applying two thin coats rather than one thick coat prevents drips, improves adhesion, and extends the life of the finish significantly.
What temperature is best for exterior wall painting?
Exterior paint should be applied when temperatures are between 50°F and 90°F. Painting outside this range risks poor film formation and can cause the job to fail within one to two years.
How do I prevent lap marks when painting walls?
Maintain a wet edge by working one section at a time and rolling into wet paint before it dries. Adding a paint conditioner to your latex paint extends the open time of the coating, which helps significantly in warm or dry conditions.
Do I always need primer before painting walls?
Not always, but dedicated primer is required on bare wood, repaired surfaces, heavily stained areas, and major color changes. Skipping primer on these surfaces leads to adhesion problems and visible stains bleeding through the finish coat.