There is a common assumption that painting is the simple part of any renovation. Pick a color, roll it on, done. But understanding why paint after remodeling matters as much as the remodel itself changes how you approach the entire project. Done in the wrong order, painting creates rework, wasted materials, and finishes that fail within a year. Done correctly, with proper timing and preparation, a fresh coat of paint is what transforms a construction zone into a finished, protected, livable space. This guide covers the real reasons behind the sequencing, the safety factors most homeowners overlook, and the practical steps that produce lasting results.
Key Takeaways
| Point | Details |
|---|---|
| Timing protects your investment | Painting after remodeling prevents damage from construction dust, debris, and accidental scuffs to fresh paint. |
| Prep determines durability | Inadequate surface preparation causes bubbling, peeling, and premature fading regardless of paint quality. |
| Color decisions improve with context | Seeing installed fixtures, tile, and lighting before selecting paint colors leads to more accurate matches. |
| Lead safety requires attention | Pre-1978 homes carry real risks during remodeling, requiring certified practices to prevent toxic dust exposure. |
| Professional execution pays off | Qualified painters bring preparation standards, material knowledge, and safety compliance that DIY typically cannot match. |
Why painting after remodeling delivers better results
The case for painting after remodeling is not just about convenience. It comes down to protecting the quality of work you have already paid for and avoiding the expense of redoing it.
When trades are active in a space, walls absorb damage. Construction activities damage surfaces through drywall patching, tile dust, accidental scuffs from lumber and fixtures, and moisture from grout or adhesive application. Any paint applied before those activities are complete will need touch-ups at minimum, and often full repainting. That is money spent twice.
Painting after remodeling also gives you the advantage of proper surface repair. New drywall seams, patched holes, and skim-coated sections all need sanding and priming before a topcoat goes on. Skipping that step is one of the leading causes of paint failure, producing bubbling, cracking, and peeling within months rather than years.
There is also a practical design benefit. Accurate color matching depends on seeing your actual fixtures, vanities, tile, cabinetry, and lighting in place. Selecting paint from a chip before the space is assembled is a guessing game. Many homeowners who paint before their remodel is complete regret the color once everything comes together.
Here is a summary of the key benefits painting after remodeling provides:
- Eliminates rework caused by construction damage to fresh surfaces
- Allows full drywall repair and priming before topcoats are applied
- Supports accurate color decisions based on finished fixtures and lighting
- Provides a moisture-resistant and protective layer on newly renovated surfaces
- Reduces overall project costs by avoiding partial repaints
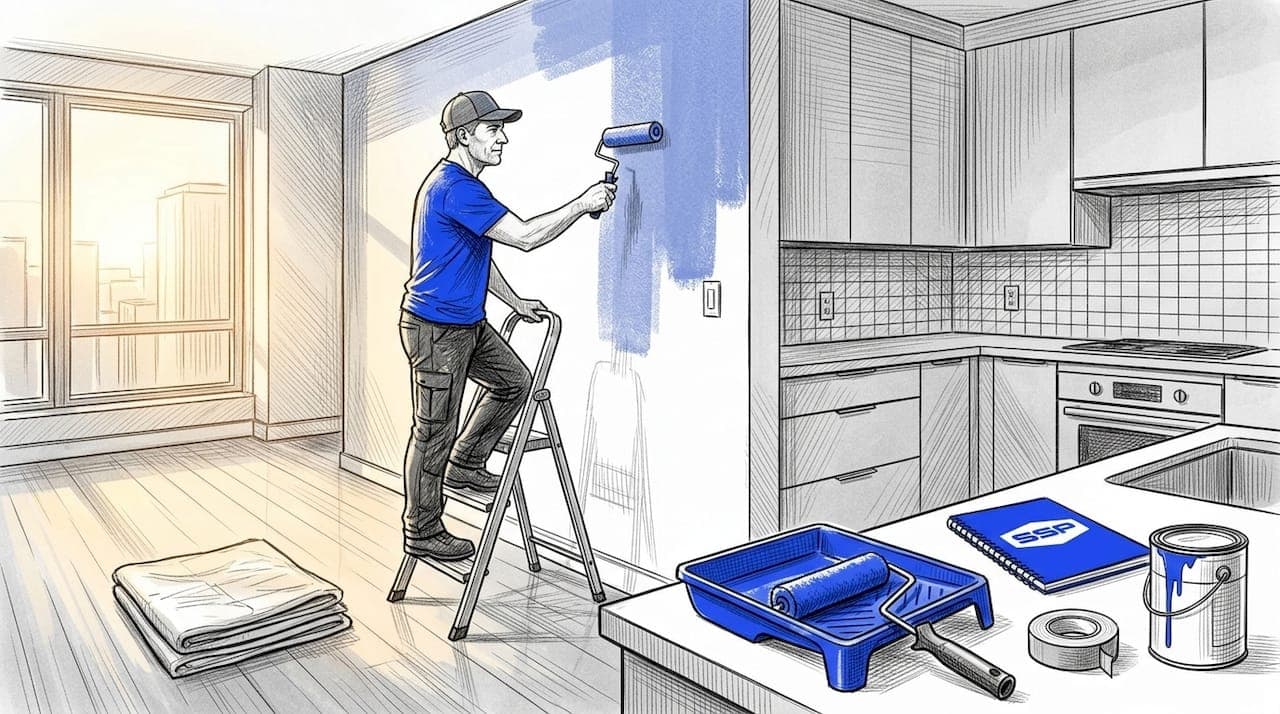
Pro Tip: Schedule your paint consultation after cabinetry and tile are installed but before flooring goes down. That sequence gives you accurate color context while still protecting your new floors from drips and overspray.
When to paint during the remodel sequence
Getting the timing right means understanding what happens in each phase of a remodel and where painting fits cleanly into that order.
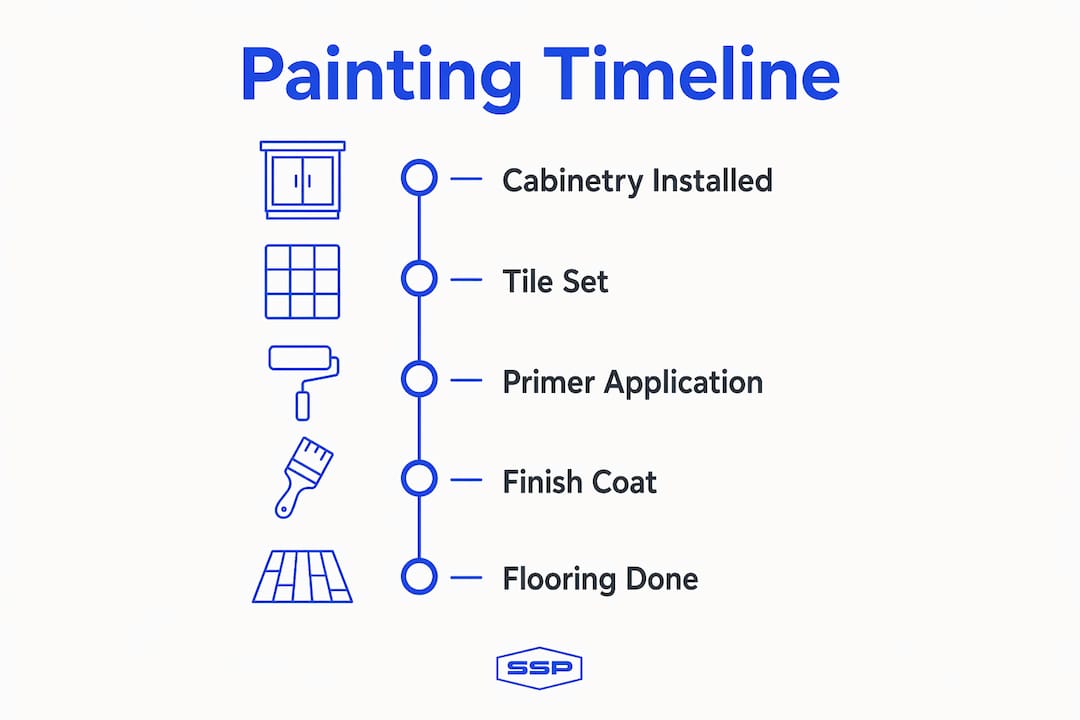
A standard interior renovation follows this general sequence, and your painting schedule should be built around it:
- Demolition. Old materials come out. Walls may be opened for plumbing or electrical access. No painting at this stage.
- Rough mechanical work. Electrical, plumbing, and HVAC are roughed in behind the walls. Any drywall that was opened gets closed and patched here.
- Drywall finishing. Seams are taped, mudded, and sanded. This is one of the dustiest phases of any project. Priming can begin once surfaces are fully dry and sanded smooth.
- Tile and flooring prep. Backer board, mortar, and tile work generate dust and moisture. Hold final paint coats until this is complete in the affected area.
- Trim, doors, and fixture installation. Once these are in place, final paint coats on walls and ceilings make sense. You can cut in cleanly around trim that is already set.
- Flooring installation. This is the last major step before painting is fully complete. Painting walls before floors go in protects against sawdust and adhesive migration.
There are exceptions to this sequence worth knowing. Ceilings and adjacent rooms that will not be disturbed by the active work can be painted earlier without meaningful risk of damage. If you are renovating a single bathroom, the hallway ceilings outside can be painted on an independent schedule.
One technical factor that gets overlooked is moisture. Newly patched drywall, fresh tile grout, and newly applied joint compound all off-gas moisture as they cure. Adequate drying time before painting prevents trapping that moisture under your paint film, which would cause peeling and bubbling regardless of paint quality.
Pro Tip: Apply a coat of primer-sealer over all patched and repaired drywall before your finish coat. Primer creates a uniform surface that prevents flash spots where patches absorb paint differently than the surrounding wall.
Safety and quality standards in post-remodel painting
Beyond timing and aesthetics, there are safety considerations in post-remodel painting that carry real consequences if ignored.
The most serious involves lead paint. Homes built before 1978 very likely contain lead-based paint on walls, trim, and ceilings. Remodeling work that cuts, sands, or disturbs those surfaces generates toxic lead dust that poses significant health risks, particularly for children and pregnant women. Any painting work that follows a remodel in a pre-1978 home should involve contractors who hold EPA Lead Renovation, Repair, and Painting (RRP) certification.
"DIY projects in older homes can spread lead dust throughout the living space without proper containment, PPE, and certified handling procedures. This is not a risk worth minimizing to save a few hundred dollars on labor."
Professional painters bring more than speed to a renovation project. They bring preparation standards that most homeowners do not apply consistently. Professional painting expertise covers surface assessment, proper product selection for the substrate, application technique, and compliance with local and federal safety requirements. That expertise is what separates a finish that looks good for six months from one that holds up for a decade.
Quality-minded homeowners are increasingly treating paint not as a cosmetic step but as a protective layer. Higher-quality paint and preparation reduce maintenance costs over time by resisting moisture penetration, staining, and surface wear. Bathrooms and kitchens renovated without moisture-resistant coatings frequently show mold or paint failure within two years.
Here is what to watch for when evaluating whether safety and quality standards are being met on your project:
- Contractor holds EPA RRP certification for pre-1978 properties
- All patched surfaces are primed before topcoats are applied
- Proper ventilation is maintained during application and curing
- Products selected match the substrate (drywall, plaster, tile backer, etc.)
- No painting occurs until construction dust has been fully cleaned from surfaces
How to prepare and execute painting after renovation
Knowing why to paint after remodeling is one thing. Executing it well requires a practical plan that covers preparation, product selection, and scheduling.
Surface preparation
This step determines the outcome more than any other. Clean all surfaces with a degreaser or TSP substitute before sanding. Sand patched areas smooth and feather the edges so repairs disappear under the topcoat. Apply a quality primer over bare drywall, patches, and any stained or tannin-rich surfaces like new wood trim.

Choosing the right finish for each space
The finish you choose affects both appearance and longevity. Use this reference when selecting paint for renovated rooms:
| Room Type | Recommended Finish | Why It Works |
|---|---|---|
| Bathroom | Satin or semi-gloss | Resists moisture and mold, easy to clean |
| Kitchen | Semi-gloss or eggshell | Handles grease, scrubbing, and steam |
| Living room / bedroom | Eggshell or flat | Hides surface imperfections, low sheen |
| Trim and doors | Semi-gloss or gloss | Durable, highlights architectural detail |
| Ceilings | Flat white | Minimizes light reflection, hides texture |
Selecting the best paint for remodeled rooms means matching the finish to the actual demands of the space. A flat finish in a bathroom is a quality problem waiting to happen.
Scheduling and coordination
Work with your contractor to identify the exact point when dust-generating trades are finished and surfaces are ready for paint. In most projects, that window falls between drywall final and flooring installation. Coordinating this transition with clear communication prevents costly scheduling gaps and protects your newly applied finish.
Pro Tip: For cost-conscious homeowners, focus premium paint on high-traffic and high-humidity areas where durability matters most. Using a mid-range product in low-stress rooms like bedrooms can reduce material costs without meaningful sacrifice in long-term performance.
Additional considerations when planning your post-remodel paint project:
- Allow 24 to 48 hours after priming before applying topcoats
- Paint ceilings before walls to catch any drips on unpainted surfaces
- Remove or fully protect all hardware, fixtures, and outlets before painting begins
- Apply two full coats for consistent coverage and color depth
Learning more about lasting wall painting methods can help you make better decisions about application technique before your project starts.
My perspective on painting after a remodel
I have seen the same scenario play out more times than I can count. A homeowner or property manager rushes to paint right after drywall goes up, trying to get the space finished as quickly as possible. The color looks great for about three weeks. Then the tile contractor comes in, grinds out some grout lines, leaves a fine white dust across every wall, and the fresh paint is already compromised. The job has to be redone, which was exactly what they were trying to avoid.
What I have learned from managing renovation-to-paint transitions is that the patience required to wait for the right moment pays back in quality that holds for years. Coordinating with your general contractor to establish a clear handoff point, usually after tile and trim and before flooring, is the single most impactful scheduling decision in any remodel.
I also want to address the DIY instinct directly. There is nothing wrong with taking on painting yourself in the right circumstances. But in a freshly renovated space, particularly in a pre-1978 home or a high-moisture area, the preparation requirements and safety considerations are serious enough that professional execution is worth the investment. A professional painter who understands the benefits of repainting post-remodel brings technical knowledge and accountability that protects your renovation investment at every step.
The finish coat is the last impression your remodel makes. Treat it accordingly.
— Ryan
Ready to finish your remodel the right way?
At Southshorepaint, we specialize in exactly this kind of work: post-remodel painting where preparation, timing, and material quality determine whether a renovation looks finished or just complete.

Our team understands the full sequence of a renovation project and knows how to coordinate paint work around your contractor schedule so nothing gets redone. We use premium products selected for the specific demands of each space, and we hold the safety certifications required for lead-safe work in older homes. Whether you are finishing a single bathroom or completing a whole-home renovation, Southshorepaint delivers results that protect and complement everything you have already invested in. Schedule a consultation with our team today to get a detailed estimate and a clear plan for your post-remodel painting project.
FAQ
Why should you paint after remodeling instead of before?
Painting after remodeling protects fresh surfaces from construction damage caused by dust, debris, and scuffs, and allows proper surface preparation on repaired drywall before topcoats are applied. Painting before the remodel is complete almost always results in costly rework.
Is painting necessary after remodeling?
Yes. Remodeling disturbs and damages wall surfaces, which require cleaning, patching, priming, and fresh paint to restore both appearance and protection. Skipping this step leaves surfaces vulnerable to moisture, staining, and premature paint failure.
How do I choose paint after a renovation?
Match the finish to the demands of the room. Bathrooms and kitchens need moisture-resistant finishes like satin or semi-gloss. Living areas perform well with eggshell. Always prime repaired surfaces before applying your final coats to get consistent, lasting coverage.
Do I need a professional painter after a remodel?
For pre-1978 homes, yes. Remodeling disturbs old paint that may contain lead, and EPA-certified contractors are required for safe handling. For any renovated space, professional painters bring surface preparation expertise that significantly extends the life of the finish.
When is the best time to paint during a remodel?
The optimal window is after tile, trim, and drywall repairs are fully complete but before final flooring is installed. This protects new floors from drips while giving you accurate design context from installed fixtures and finishes.